In this article we will discuss about:- 1. Bolted Connections in Steel Structures 2. General Principles in Bolted Connection Designs 3. Assembly 4. Design Strength 5. Tension Capacity 6. Prying Forces 7. Bolt Subjected to Shear and Tension 8. Assumptions.
Bolted Connections in Steel Structures:
In steel constructions, connections become necessary at various places.
Connections become necessary to connect the following:
(i) Truss members at joints.
ADVERTISEMENTS:
(ii) Beam to beam, beam to column, truss to column.
(iii) Column to foundation and so on.
Bolts are most commonly used in structural steel connections where the line of action of the load is perpendicular to the bolt axis as shown. In this condition the principal force in the bolt is shear.
Sometimes the bolts are placed such that their axes are parallel to the line of action of the load. In this condition the principal force in the bolt is tensile.
ADVERTISEMENTS:
Common bolts are installed in the snug tight condition. A snug tight condition means the tightness needed to bring the components to firm contact. In these connections slip of the bolts under service load conditions is acceptable and load fluctuation or vibrations are not design considerations.
Bolts can be used to make various types of connections.
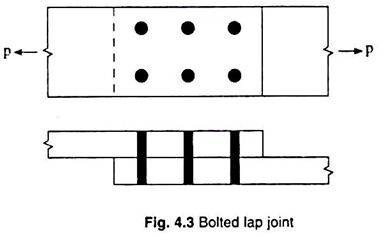
Fig. 4.3 shows a bolted lap joint connection provided for a tension member, with snug tight bolts. Applying a pull allows the plates to slip until the clearance between the bolt and the edge of the hole is taken up forcing the bolts to bear on the plates. The applied force is assumed to be distributed to the bolts. Fig. 4.4 (a) shows one of the bolts in a connection.
ADVERTISEMENTS:
The bearing stress acting on the contact area between the bolt and the plate is shown in Fig. 4.4 (b) and is given by:
where, Ab = projected area in bearing
= dt
ADVERTISEMENTS:
where, d = diameter of the bolt
and t = thickness of the plate.
Fig. 4.4 (c) shows the bearing stress on the bolt. Fig. 4.4 (d) and (e) show the shear force acting on the bolt. The maximum shear force acting on the bolt occurs at the level of the contact surface of the two plates.
The shear stress on the bolt at this critical shear plane is:
In some situations pretensioned or slip critical bolts are used.
Pretensioned bolts have applications in the following connections:
(i) Column splices in multi-storeyed structures over 40 m in height.
(ii) Connection of beams and girders to columns or to beams and girders on which the bracing of columns is dependent, in structures over 40 m in height.
(iii) Roof truss splices – Truss to column connections, column bracings, knee braces, crane supports, structures carrying cranes of 50 kN capacity.
(iv) Connections for supporting machinery, live loads causing impact and load reversal.
Fig. 4.5 (a) shows a slip-critical bolt. Its action depends upon the friction induced between the components connected due to the clamping effect of the pretensioned bolts to transmit the load from one component to the other. At service loads no slip can occur. Fig. 4.5 (b) shows how the force between the connected components is transmitted by friction.
A lap joint has a disadvantage since bending stresses are also induced due to eccentric transmission of load. This can be avoided by providing a butt splice joint.
The bolts in a butt splice joint with two cover plates are in double shear with two shear planes. Shear capacity of each bolt is twice that of the same diameter in a lap joint.
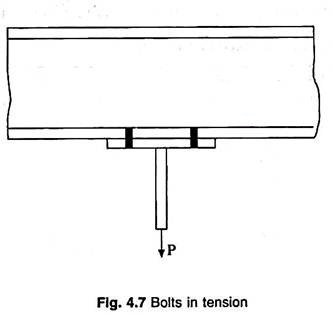
Fig. 4.7 shows the bolt connection for a hanger. A hanger is shown connected to the bottom flange of a girder.
In this connection the bolts are in tension.
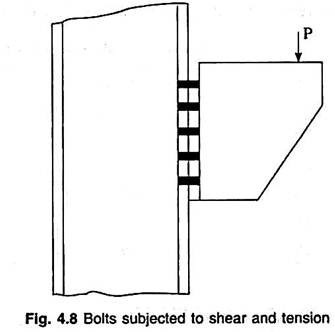
In some connections the bolts are subjected to shear as well as tension. Fig. 4.8 shows one such connection. This connection is called a bracket connection. All the bolts are subjected to equal shear. The tensions are different in the bolts. The top bolts are subjected to maximum tension.
General Principles in Bolted Connection Designs:
Need arises for structural connections when two different members are to be joined together. Connecting a beam to a column or a beam to a beam or to provide a splice to make a long member are just a few examples of bolted connections.
The following general principles should be followed in making bolted connections:
(i) In situations of members liable to impact, vibrations, load reversal the connections should not use bolts in clearance holes.
(ii) Bolts of diameter 30 mm and more, particularly HSFG bolts may lead to installation problems. Alternatively, it is advisable to provide more number of bolts of lesser diameter.
(iii) It is good to standardize on one particular grade of bolt in the connections of a structure. It is also good to limit the number of different sizes and grades of bolts in a structure. Where compelling situations need the use of different grades of bolts, inadvertedly using a lower grade of bolt in place of the specified higher grade of bolt can be avoided by recording clearly the grade and size, for ex. 16 mm black bolt, 20 mm grade 4.6 etc.
(iv) Before suggesting HSFG bolts it is necessary to check for possible installation problems. These bolts may be used only when absolutely necessary.
(v) It is better to avoid unnecessary splicing in columns unless there is considerable saving of material or special factors needing such splicing. It is likely that it may be cheaper to let the column run with its larger section through.
Bolt Holes:
Holes through more than one thickness of material for members, such as compound stanchions and girder flanges shall be where possible, drilled after the members are assembled and tightly clamped or bolted together. A round hole for a bolt shall either be machine flame cut or drilled full size, or sub punched 3 mm under size and reamed to size or punched full size.
Hand flame cutting of a bolt hole shall not be permitted except as a site rectification measure for holes in column base plates.
Punching:
A punched hole shall be permitted only in material whose yield stress fy does not exceed 360 MPa and where the thickness does not exceed 5600/fy. mm. In cyclically loaded details, punching shall be avoided in plates of thickness greater than 12 mm.
For greater thickness and cyclically loaded details, holes shall be either drilled from solid or sub punched or sub-drilled and reamed.
The die for all sub-punched holes or the drill for all sub-drilled holes shall be at least 3 mm smaller than the required diameter of the finished hole.
Over Size Holes:
A special plate washer of minimum thickness 4 mm shall be used under the nut, if the hole diameter is larger than the bolt diameter by 3 mm or more. Oversize hole shall not exceed 1.25 d or (d + 8) mm in diameter, where d is the nominal diameter of the bolt in mm.
A short slotted hole shall not exceed the appropriate hole size in width and 1.33 d in length. A long slotted hole shall not exceed the appropriate hole size in width and 2.5 d in length. If the slot length is larger than those specified, shear transfer in the direction of slot is not admissible even in friction type of connection.
Slotted holes shall be punched either in one operation or else formed by punching or drilling two round holes apart and completed by high quality mechanically controlled flame cutting and dressing to ensure that bolt can freely travel the full length of the slot.
Fitted Bolt Holes:
Holes for turned and fitted bolts shall be drilled to a diameter equal to the nominal diameter of the shank or barrel subject to tolerance specified in IS 919 (Parts 1 and 2). Preferably, parts to be connected with close tolerance or barrel bolts shall be firmly held together by tacking bolts or clamps and the holes drilled through all the thickness in one operation and subsequently reamed to size.
All holes not drilled through all thicknesses in one operation shall be drilled to a smaller size and reamed out after assembly. Where this is not practicable, the parts shall be drilled and reamed separately through hard bushed steel jigs.
Holes for bolts shall not be formed generally by gas cutting process. However, advanced gas cutting processes such as plasma cutting may be used to make holes in statically loaded members only. In cyclically loaded members subjected to tensile stresses which are vulnerable under fatigue, gas cutting shall not be used unless subsequent reaming is done to remove the material in the heat affected zone around the hole.
Assembly of Bolted Connection:
All parts of bolted members shall be pinned or bolted and rigidly held together during assembly.
The component parts shall be assembled and aligned in such a manner that they are neither twisted nor otherwise damaged and shall be so prepared that the specified camber, if any is provided.
Holes in Assembly:
When holes are driven in one operation through two or more separate parts, these parts, when so specified by the engineer, shall be separated after drilling and the burrs removed.
Matching holes for black bolts shall register with each other so that a gauge of 1.3 mm or 2.0 mm (as the case may be depending on whether the diameter of the bolt is less than or more than 25 mm) less in diameter than the diameter of the bolt hole will pass freely through the assembled members in the direction at right angles to such members.
Drilling done during assembly to align holes shall not distort the metal or enlarge the holes.
Holes in adjacent part shall match sufficiently well to permit easy entry of bolts. If necessary, holes except oversize or slotted holes may be enlarged to admit bolts, by moderate amount of reaming.
Thread Length:
When design is based on bolts with unthreaded shanks in the shear plane, appropriate measures shall be specified to ensure that, after allowing for tolerance, neither the threads nor the thread run-out be in the shear plane.
The length of bolt shall be such that at least one clear thread shows above the nut and at least one thread plus the thread run-out is clear beneath the nut after tightening. One washer shall be provided under the rotated part.
Assembly Subjected to Vibration:
When non-preloaded bolts are used in a structure subject to vibration, the nuts shall be secured by locking devices or other mechanical means. The nuts of preloaded bolts may be assumed to be sufficiently secured by the normal tightening procedure.
Washers:
Washers are not normally required on non-preloaded bolts, unless specified otherwise. Tapered washers shall be used where the surface is inclined at more than 3° to a plane perpendicular to the bolt axis.
Hardened washers shall be used for preloaded bolts or the nut, whichever is to be rotated. All material within the grip of the bolt shall be steel and no compressible material shall be permitted in the grip.
Bolting:
In all cases where the full bearing area of the bolt is to be developed, the bolt shall be provided with a washer of sufficient thickness under the nut to avoid any threaded portion of the bolt being within the thickness or the parts bolted together, unless accounted for in design.
Pretensioned bolts shall be subjected to initial tension (the proof stress) by an appropriate pre-calibrated method.
Design Strength of a Bolt (Vdb):
A bolted connection should be designed such that the factored shear Vsb shall not exceed the design strength Vdb of the bolt.
i.e., Vsb ≤ Vdh
The design strength Vdb of a bolt is the lesser of:
(i) The design shear strength Vdsb of the bolt, and
(ii) The design bearing strength Vdpb of the bolt.
(i) Design shearing strength Vdsb is given by;
where,
fu = Ultimate tensile strength of the bolt material
nn = Number of shear planes with threads intercepting the shear plane
ns = Number of shear planes without threads intercepting the shear plane
Asb = Nominal plain shank area of the bolt
Anb = Net shear area of the bolt at threads
= Area corresponding to root diameter at the thread.
Anb = π/4 [d – 0.9382 p]2 where p = pitch of threads in mm
= 0.78 to 0.80 of gross area of shank
γmb = Partial safety factor for the bolt material = 1.25
The table below gives the net area at threads for Grade 4.6 Bolts.
The nominal shear capacity of the bolt given above has to be reduced in the case of long joints, in the case of large grip length and when thick packing plates are provided.
Reduction factor for long joints βlj:
When the length of the joint lj of a splice or end connection in a compression or tension member containing more than two bolts (that is the distance between the first and the last rows of bolts in the joint measured in the direction of the load transfer) exceeds 15 d in the direction of the load the nominal shear capacity shall be reduced by the factor βlj given by-
Note:
This provision does not apply when the distribution of shear over the length of the joint is uniform, as in the connection of web of a section to the flanges.
Reduction factor for large grip lengths βlg:
When the grip length (equal to the total thickness of the connected plates) exceeds 5 times the diameter d of the bolts, the shear capacity shall be reduced by the factor βlg given by-
βlg shall not be more than βlj given above the grip length lg shall in no case be greater than 8 d.
Reduction Factor for Packing Plates βpk:
The design shear capacity of bolts carrying shear through a packing plate in excess of 6 mm shall be decreased by a factor βpk given by-
βpk = (1 – 0.0125 tpk), where, tpk = Thickness of the thicker packing plate in mm.
Considering all the above provisions, the nominal shear capacity of the bolt is given by-
(ii) Design bearing strength of a bolt Vdph on any plate is given by-
e, p: End and pitch distances of the bolt along bearing direction
do: Diameter of the hole
fub, fu: Ultimate tensile stress of the bolt and the ultimate tensile stress of the plate respectively.
d: Nominal diameter of the bolt and
t: Summation of the thicknesses of the connected plates experiencing bearing stress in the same direction, or if the bolts are counter sunk, the thickness of the plate minus one half of the depth of counter sinking.
γmb: Partial safety factor for the material of the bolt = 1.25
Tension Capacity of Bolts:
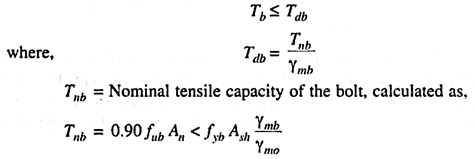
A bolt subjected to a factored tensile force Tb shall satisfy-
where, fub = Ultimate tensile stress of the bolt
fyb = yield stress of the bolt
An = Net tensile stress area = Area at the bottom of the threads, and
Ash = Shank area of the bolt
γmo = Partial safety factor for resistance governed by yielding = 1.10
γmb = Partial safety factor for material of bolt.
Prying Forces in Bolted Connection:
Consider a T-stub hanger connected to a fixed rigid horizontal member by 2 bolts. Let the hanger be subjected to a pull 2Te. If the hanger is absolutely rigid and hence does not undergo any distortion then each bolt will receive a tension Te. (Fig. 4.18 (a)).
In actual cases members are flexible. As a consequence of the distortion of the hanger its ends will exert a thrust Q at each end and as a consequence an additional pull Q is transmitted to each bolt. The actual tension in each bolt in this case will be Te + Q. This additional pull induced in each bolt due to the flexibility of the member connected is called prying force. The bolt must be designed for the pull (Te + Q).
I.S. Code Specification:
Where prying force Q is significant, it shall be calculated as given below and added to the tension in the bolt.
where, lv = distance from the bolt centre line to the toe of the fillet weld or to half the root radius for a rolled section
le = distance between prying force and bolt centre line and is the minimum of either the end distance or the value given by,
where,
β = 2 for non-pretensioned bolt and 1 for pretensioned bolt
η = 1.5
be = Effective width of flange per pair of bolts
t = Thickness of the end plate.
Bolt Subjected to Shear and Tension:
A bolt required to resist both shear force and tension at the same time shall satisfy the condition-
where, Vsb = Factored shear force acting on the bolt
Vdb = Design shear capacity of the bolt
Tb = Factored tensile force acting on the bolt
Tdb = Design tensile capacity of the bolt.
Design for Tensile Strength of Plates:
(a) Design Strength due to Yielding of Cross Section:
Design strength of a plate under axial tension Tdg as governed by yielding of gross section is given by-
where,
fy = Yield stress of the plate
Ag = Gross area of the plate section
γmo = Partial safety factor for failure intension by yielding = 1.10
(b) Design Strength due to Rupture of Critical Section:
Design strength in tension of a plate Tdn us governed by rupture of net cross sectional area at the holes is given by-
where,
γml = Partial safety factor for failure at ultimate stress = 1.25
fu = Ultimate stress of the plate
An = Net effective area of the member given by-
where, b, t = Width and thickness of the plate respectively
dh = Diameter of the bolt hole (2 mm in addition to the diameter of the hole, in case of directly punched holes)
g = Gauge length between the bolt holes as shown in Fig. 4.20.
ps = staggered pitch length between line of bolt holes as shown in Fig. 4.20.
n = Number of bolt holes in the critical section.
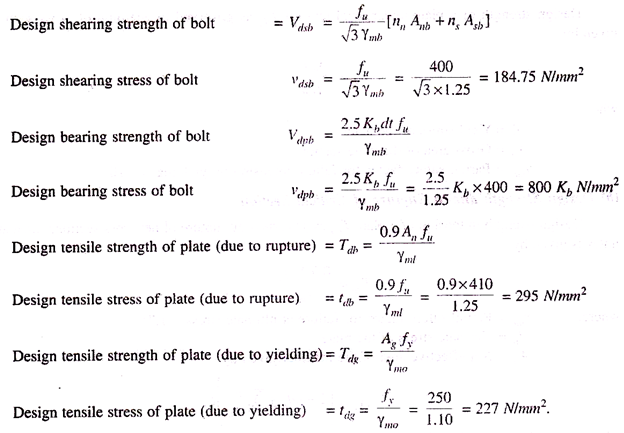
It may be convenient to use the following properties, namely design shear stress vdsb, design bearing stress vdph and design tensile stress of plates tab given below:
Lap and Butt Joints:
Plates may be connected to each other by lap and butt joints. Two plates are said to be connected by a lap joint when the connected ends of the plates lie in parallel planes. In a butt joint the connected ends of the plates lie in the same plane. The abutting ends of the plates are covered by one or two cover plates (also called strap plates).
Lap joints may be classified into single bolted, double bolted, triple bolted etc. joints depending on whether one, two, three etc. rows of bolts are used for the connection. Very often single and double bolted joints are used for connections.
Butt joints may be classified into single bolted, double bolted, triple bolted etc., butt joints depending on whether one, two, three etc. rows of bolts are used on each side of the joint.
Generally there are two cover plates in a butt joint and accordingly the bolts of such a joint are in double shear. In case a single cover plate is provided in a butt joint, the bolts will be in single shear.
Assumptions in the Analysis of Common Bolt Joints:
In the generally adopted design of bolted joints the following assumptions are made:
(i) We generally assume that all bolted connections are of the bearing type and the effect of frictional resistance against slip between the contracting plates is ignorable. The plates are taken to directly bear on the bolts while transmitting the loads.
(ii) Any deformation of the plates due to loads is ignored.
(iii) Shear load on a bolt is assumed to be uniformly resisted by the bolt section.
(iv) Effect of stress concentration in plates around bolt holes is ignored.
(v) The bearing stress between the bolt and the plate is taken to be uniform on the bearing area.
(vi) Bending of the bolt is ignored.
There are however certain variations in the actual performance of the bolted connections:
(i) When dynamic loads act causing stress reversal, fatigue failure is likely and there may also be considerable stress concentrations.
(ii) Friction between the plates exist at low loads on plates. At intermediate loads the plates are liable to slip and at high loads the plates undergo substantial slip resulting in a bearing joint.
(iii) The load distribution to the bolts can be expected to be uniform only at ultimate condition. Under working load conditions the load distribution is unlikely to be uniform.
The most commonly used connections are lap and butt connections. In a lap connection since the connected plates are not along the same line and are in parallel planes, the plates are subjected to a small bending moment. This may not be a serious disadvantage as in most cases the forces in the plates are reasonably small.
In a lap connection the lap of the plates shall not be less than five times the thickness of the plate. In a butt connection double cover plates are preferred to avoid bending and to maintain symmetry. The sum of the thicknesses of the cover plates shall be at least 5 per cent greater than the main plate.
For a connection to be safe, the bolts should be safe and the main plate and the connecting plates should be safe.
